
Backup Old Hard Disk Data
First, we need to back up the data on the old hard disk completely. Insert the old hard disk into the BGA60 Nand chip socket. Download i2C Assistant from i2C official website, install and register. After login, connect the P14 Pro programmer to the computer to operate.Select the "Backup Underlying Data" function, and save the underlying data of the old hard disk to the computer.
This step is very critical, as it can ensure that no important information is lost during the hard disk storage expansion process.
Replace with New Hard Disk
After the backup is complete, we can start the hard disk storage expansion steps. Insert the new hard disk into the BGA60 Nand chip socket, select the "Write Backup Underlying" function in the software, and write the previously backed up data to the new hard disk.This not only ensures data integrity, but also significantly shortens the time required for the entire expansion process.
Install New Hard Disk
Next, we need to install the new hard disk into the iPhone 6 Plus. This requires some professional iPhone disassembly tools. After the installation is complete, we can use the flashing software to refresh the system of the iPhone and complete the startup.iPhone 7 Hard Disk Storage Expansion
For the iPhone 7, the hard disk storage expansion process is also similar. We can use the i2C P14Pro BGA70 Nand module to complete this operation. Similarly, first place the old hard disk in the BGA70 Nand chip socket, use the i2C Assistant to query the disk information and back up the underlying data.Then place the new hard disk in the BGA70 device and use the i2C Assistant to write the backup data to the new hard disk. Finally, install the new hard disk into the iPhone 7 device and use the flashing software for system refresh.
Through the above steps, we have successfully completed the hard disk storage expansion operation for the iPhone 6 Plus and iPhone 7. Whether it's capacity or read/write speed, the new hard disk will bring a significant boost, greatly improving the user experience.
However, when disassembling the hard disk, we still need to be careful and avoid any damage to the hard disk.
iPhone X Purple Screen Issue Fix
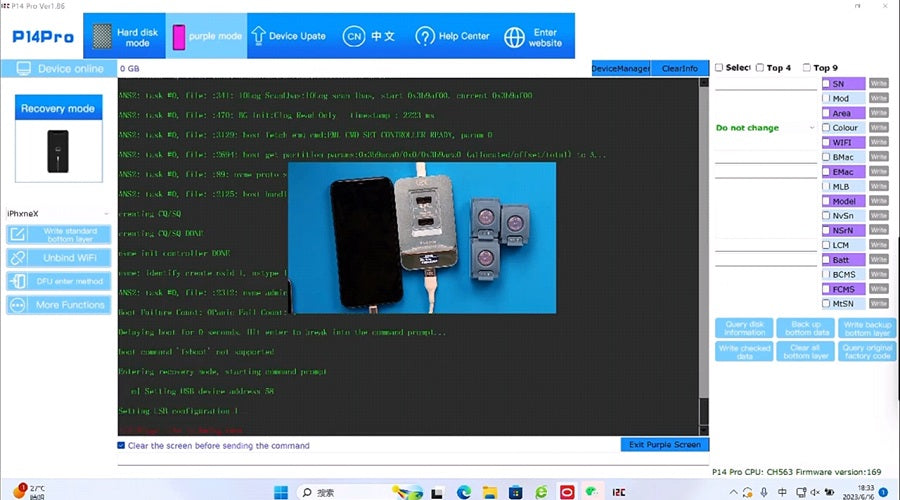
In addition to the common iPhone 6 Plus and iPhone 7 models, the iPhone X is also a very popular flagship device. But this phone can also have some minor issues during use, the most prominent of which is the purple screen phenomenon. This problem not only affects the appearance, but also makes users feel very troubled.For the purple screen problem of the iPhone X, the industry has also proposed a dedicated solution. That is, to replace the hard disk and install the purple screen detection code using the P14Pro BGA110 Nand module.
Backup Old Hard Disk Data
First, we also need to back up the old hard disk data. Place the old hard disk in the BGA110 device, run the BGA110 software to query the disk information and back up the underlying data, ensuring data security.Replace with New Hard Disk
Next is the hard disk replacement step. Place the new hard disk in the BGA110 Nand module, select the iPhone X model, click the "Format Repair" function to initialize the new hard disk. Then select the "Write Backup Underlying" function to write the previously backed up data to the new hard disk.Finally, install the new hard disk into the iPhone X device and use the flashing software for system refresh.
Install Purple Screen Detection Code
It is worth mentioning that after completing the hard disk replacement and flashing, we also need to install the "purple screen detection code" to solve the screen problem of the iPhone X. This operation can also be done through the BGA110 Nand module, and only needs to be installed after flashing.Through the above steps, we have not only successfully increased the hard disk storage capacity for the iPhone X, but also solved the purple screen problem on the screen. This undoubtedly greatly improves the user experience of the phone, allowing users to fully enjoy the excellent performance of the iPhone X.
You Need To Know
In general, whether it's the iPhone 6 Plus, iPhone 7, or iPhone X, through professional hard disk storage expansion and problem fix operations, we can inject new vitality into these models. However, when implementing these operations, we still need to be careful and cautious, especially during the hard disk disassembly process, to avoid unnecessary damage.In addition, users also need to pay attention to a detail, that is, the BGA60 or BGA70 devices do not support formatting and repairing the new hard disk.
If the new hard disk has been formatted, it needs to be installed on the phone first, and then the system recovery can be performed through the flashing software. This step is also very critical, otherwise it may lead to data loss or other problems.
If you need more iPhone repair tools and iPhone spare tools, Phonefix provides you with high-quality iPhone repair tools, iPad repair tools, and MacBook repair tools as well as original iPhone Parts such as iPhone LCD screens, iPhone cameras, and iPad spare parts.